Showing posts with label artman Greg. Show all posts

Sunday, January 10, 2010

NEW ARTWORK!

Here’s my latest scratchboard: “One Way Ticket.”


I have been working on this piece off and on since 6/08 and had the idea and reference material even earlier than that. The idea never left my mind, but I just needed a good chunk of time to devote to it. Yet I learned along the way that I could work on it in small 5 minute bits as well. I also discovered 2 things: 1. It didn't matter what kind of music I listened to as I worked on the piece (since I was working on it close to Christmas time I was listening to Christmas music), and 2. I could work on artwork in public without losing my creative zone (probably because so much of the legwork was completed before I did the work in public). Finally this year I did get that big chunk of time and I worked on the piece pretty much nonstop for 6-7 hours a day for 2 weeks. This was the push I needed to get it done, and it is finished, as of 1/10. If I had just worked on it from idea to sketch to finish, it would have only taken me about 1 month. The piece is 13x28. I signed it upside down so that my signature looks more like a design element of the work.

The combination of the American flag and slave ship motifs calls to mind the friezes of ancient Rome and Egypt, or the black figures of Greek pottery.

My original idea was to have Store room with stars in it, stars that could be read to identify this flag as “American” rather than literally counted out as 50 stars. But it didn’t look right and people kept asking what Store Room meant.


This was the original idea as I wrote it down years ago: “Slave ship of men wearing orange jumpers entitled Prison or Shackled or something.”

It was a happy accident or coincidence that a knotted flag is called a waft or weft flag, and of old was displayed as a sign of emergency or distress at sea.

Each man in this piece is an individual. Each one has a story to tell. So they all had to be hand-drawn individually, with their own uniqueness. No two are exactly the same. They deserved to be rendered that way.

This piece went through several name changes. A few titles I played around with: Today, Statistics, The New Slavery, etc. Then after I finished the piece and told my wife I wasn’t sure what to call it, she suggested “One Way Ticket.” The title emphasizes the link of the present to the past; how the slave ship was a one way ticket to America and you weren’t coming back the way you came, and how the root of the minority prison problem today can be traced back to that origin. I decided to go with her title.

At some point I thought of this as a series. The first one was going to be a slave ship on the flag, then the next one was going to just be the bodies, no flag/ship, and the last one was going to be this one with the prisoners/slave ship/flag, including one white and one Hispanic prisoner. Statistically there are more blacks in prison than other ethnic groups and I wanted to emphasize that.

My original intention of creating the piece was to illustrate how American prisons are overcrowded with a minority population, how the whole issue of prisons and the treatment of prisoners in America has this country in distress, and that it was symbolic of a type of slavery.
It’s interesting because the two Hispanic people who saw this piece thought that it symbolized immigration or immigrants being sent back to their country on a ship. It could work as that message also.

Here are a few blog entries that describe the process involved with creating this work:
“I've been preparing to start a new piece of art that will be based on slavery. It will present slavery as a metaphor for something else. That is the only detail I am giving at this point, but I invite you to stay tuned as I share the progress and process of making it. I had this idea a few years ago but now is the right time for it to come forth. When I prepare to create some of my work, I usually base it on a thumbnail sketch of an idea I've captured on paper and filed away. I do online research on the subject. I try to find books that I have that reference the subject. After I'm satisfied with the research I begin my sketch, deciding how big or how small the work should be, how it will relate to the edges of the paper, and laying down the basic shapes in the work. Right now I have finished my sketch and will create a more finished drawing that I will base the actual work on. This time I will be using one color, and I haven't decided yet on how I want to apply the color to the scratchboard. I thought of one method so far but it may not be archival, and part of the impact of this piece will be the color I use. So far I have decided that the piece should be 14x30 but that may change as I work on it. I need it to be at least that size so the detail can be seen.”
Starting out: the finished ship sketch on tracing paper. Adding the knot for the flag will be next -


“I'm about 50% through my drawing, and it is coming along fine. As I work on it I think about what people's reaction to it may be, and I wonder if it has been done before. I haven't seen anything that looks like what I'm doing so I expect it to have the desired effect when I'm done. As I work on it I can tell it will be a gripping image once it's done. In order to completely finish the drawing I'm going to need another reference picture for the flag knot, or set up the shot I need and draw it.”

“Did not make as much progress on the tracing but I am about 75% done with it, so I am happy that it is closer to being finished. I work on it when I can. Some days I only get a few minutes; other days I have a little while to work on it. It could be frustrating but I won't let it be.”

“Part of the image involves a knot. I haven't drawn a knot in fabric for quite a while, so I was concerned with how it was going to look. I knotted a piece of fabric for reference and began to draw. At first it was hard to keep from drawing on autopilot. My brain said, "Oh, ok. I have a general idea of what knots should look like, so instead of drawing what I see I'll draw a knot from memory." I could tell this was starting to happen so I forced myself to really see the knot and draw it. Then my brain said, "Ok, now that you've decided to draw what you see, it has to look exactly like it." That really wasn't my goal either. If it's too perfect it won't work with the rest of the drawing. In the end I enhanced my drawing with the knots from memory, while editing what I captured from the knot in front of me. At first I didn't like how it came out. But after I left it alone for awhile and came back, it looked just right.”


“It is emotionally draining working on this piece and I think that is why it is going so slowly. If I can stay on course then I will get it completed.”

“I'm 95% done with my drawing; I just have to add the final touches to it and then I can make a value sketch. I'm pretty certain already how the piece will look even without the value sketch, but I will still do it just to be sure. I'd rather not have any surprises later on when I'm working on the finished piece.”

“This week I was able to complete the drawing and rub the back of it with a pencil. That way I can use it to transfer the image to the scratchboard. The next step is to trace the image onto the scratchboard and then scratch it out. As I trace the image I will make minor corrections and changes as I see fit, so it won't be an exact copy. By the time this art is done I will have drawn and redrawn the image 3-4 times.”
The image traced onto scratchboard and beginning scratches:
The image completed on scratchboard:
Adding the orange prison jumpsuits to each man, using orange acrylic paint:
Detail:
I carefully scratched out each man's outfit, leaving thin lines of scratchboard to separate the arms and the pants so I could paint in the orange jumpsuits:
Progress being made:
Nearly done:

Sunday, December 13, 2009

Snowflakes in the air...

Here is a snowflake that I knitted from a pattern that I got from http://loomlady.blogspot.com/search?q=snowflake (the 11/7/07 post):

I thought it would be a lot harder to do, but I followed the instructions carefully and I really like the results! I used a piece of paper to keep track of the number of stitches I was doing while I created it. I used the Bernat Baby yarn, which I think is a little too delicate for the snowflake. I will try it again using a regular white yarn. It only took me 1.5 hours to make (since I was being so careful to follow the directions) but it got faster at the end as I got more used to the kind of stitches I was doing. It measures 3.5 inches across. The directions said to use fabric stiffener to finish it off, but I haven't done that yet and am deciding whether or not I will do that step. Probably on the next one (or the next few ones). I never thought you could create something like this on a loom!

Thursday, December 10, 2009

Still Scratchin...

My scratchboard project is 90% done now, I just have to add a few finishing touches and mount it on a different piece of scratchboard, since the one it is on is worn from being worked on. And I'll have a nice long narrative with pictures to talk all about it when I post it to the blog next week!

My Christmas Stocking

Here's my Christmas stocking!


It took about 3 days to complete (working just about an hour each day). It is 15.5 inches long. A few nice long sticks of candy should fit nicely in there! This is using the Lion Brand Holiday Homespun colors. The challenging part was the heel of course. I may just get some cheap yarn and knit a bunch of practice heels until I get comfortable with it. I really like how the stocking came out and I'm considering adding something else to it as a decoration. I'm going to try my hand at making a snowflake, and if it comes out right, I will add it to the stocking (if it looks right on it). I also have to add the loop for the stocking to be hung by the chimney (with care, of course!)

Wednesday, December 9, 2009

Delicious baby hat

Here's the latest:

I think it looks absolutely delicious, like a green and white peppermint! My newborn baby hat series is turning out to be quite nice.

I am working on a red and green Christmas stocking and expect to be done with it tomorrow.

Scratchboard

I am making awesome progress on my next scratchboard, it is 85% done. I still keep going back and forth on what I should entitle it. It is a very striking image and I don't want it to be held back for lack of a sufficient title.

Thursday, December 3, 2009

My new baby...

Baby HAT, that is!!! Fresh from the loom, combining the Country Loom Landscape and Bernat Baby Coordinates White:

I must say that the Bernat is lasting for a VERY long time and it combines well with other yarns.

Wednesday, December 2, 2009

My latest hat

Here's the newest one, I just finished it today:
I used Loops & Threads Country Loom yarn. This is one that I haven't used before and I found it to be very easy to work with. It is 100% acrylic, and the color is called Landscape. I would buy it again.

Tuesday, December 1, 2009

It's baaaaack!!!!!

Due to an unexpected increase in the amount of time I have available (don't bother asking me how), the scratchboard project that was on the back burner due to loom knitting has come roaring back with a vengeance. I am a little more than halfway done with a project that I started months ago. I accomplished so much in just 2 days! If all goes well, at the end of the week I will have a new piece to post and sell!

Children's Church Projects

Here are a few more crafts I assembled for the children's church:


Sunday, November 29, 2009

It's finished!!!

Here are the green leaves for the poinsettia completed and assembled:


And here is the poinsettia!!!

I am so proud of myself for doing it and I think it came out really nice! It measures 12 inches across, which is a bigger size than the instructions stated. But that is probably because I kept losing count of the number of rows I was knitting for the green leaves, so they aren't all the same size.


Most of the time you only get to see the front of a project. Well, here is what the back looks like. That little bit of red yarn is what is left from me knitting the red to the green:

Tuesday, November 24, 2009

Lovin' that flower!

Everyone who sees my poinsettia is giving it raves!And it isn't even done yet! Next I am kntting the green leaves that will be attached behind it. I have finished 4 so far:

I only need two more, which I expect to complete tomorrow.The first 3 didn't come out so well. They are uneven and skinny to me. But I altered the directions a little bit and the last one I did came out better. Most of the green leaf will be hidden behind the red ones anyway, so it won't be too noticeable. See if you can pick out which one is the last one I did.

Monday, November 23, 2009

Leaves Assembled

Voila! The poinsettia! It only took a few minutes to assemble the red leaves.

I made the yellow part using Bernat Satin Sport Warm Yellow and 15 yellow pony beads. The instructions were to string the beads onto the yarn first and then knit them in. At first I thought this was going to create a tangled, loose mess, but I knit it taut and cinched the bottom closed. As I gathered the top it clustered into the neat ball that you see here. I didn't have the Knifty Knitter spool loom, so I improvised using the pink loom, removing one of the pegs, and using a loom clip, as below:

This was easy to do. Here is what the back of the poinsettia looks like:

So far I have completed 3 of the green leaves, which I will post shortly.

Saturday, November 21, 2009

Here are the leaves!


My wife said they look like chili peppers. They do, actually. The way I arrranged them on the page could be a work of art unto itself.

Friday, November 20, 2009

Poinsettia almost half done...

I’m finally getting the hang of making these red flower leaves. I was able to get one done in less than 30 minutes today! I’m on the last one now, number 6. It was a little tight even though I kept the yarn loose; I’m not sure why. Once number 6 is done, I’ll post a picture of the leaves, then I’ll sew them together per the instructions and post a picture of them all sewn together. I was thinking last night that I could make the entire plant, but I don’t feel that ambitious (yet). The day may come.

But I did get an idea for Thanksgiving. It would be a nice little craft to put on each guest’s plate at the dinner. That is, if it turns out right when I make it. I don’t expect that I’ll have it ready in time for such a thing, but it will be a neat little something for later. Too bad I thought of the idea so late.

Thursday, November 19, 2009

Finally Knitting Easier...

I finally figured out a good way to wrap the yarn on the loom. I wrap it on as gently as a feather. It isn’t loose but it doesn’t get taut like it was getting before, and I am able to knit without the difficulty and tightness I was experiencing.

Today I knitted the rest of the second flower leaf and completed another one. So now half of the flower is complete! Just 3 more red flower leaves to complete and I can start on the green leaves. I can tell it is going to look really nice when it is done. I'm excited!

Wednesday, November 18, 2009

Loom Clips

I forgot to mention that I used loom clips as I was knitting the practice sock. Using the clips was easy... SNAP! and they are in place. But unsnapping them must be done carefully. I was concerned that I might break them as I twisted them off, but I didn't.

I am almost finished with the second leaf for my poinsettia. I'm still struggling with the yarn being wrapped too tightly on the loom, so I have to find that "perfect" balance to knit with. The two main problems with the yarn being too tight are: 1. sometimes the peg pops out of the loom while you're trying to pull the yarn over the top of it, and 2. sometimes the yarn you are trying to knit over comes off as you are trying to knit off. So both strands of yarn are left dangling while you try to figure out which one belongs on top. ARGH!

Tuesday, November 17, 2009

Tangled

Yesterday I was working on the second leaf for the poinsettia, but I wound the yarn too loosely around the loom and it just became a tangled, confused mess. I will start again today!!

Saturday, November 14, 2009

Incurable...

I can’t escape: I was doing laundry and I saw a knitted hat my wife had, and I thought to myself, I could do that…

I was in the closet and I saw one of my wife’s sweaters hanging there, and I thought to myself, that’s an interesting pattern, I could try that…

I was reading the paper and I saw a production still from the movie, Fantastic Mr. Fox. Mr. Fox is talking to his wife, who has on a knit sweater. I thought to myself, that could have been my sweater in that movie! Does anybody else go through this?

Loom Lunacy

It’s official… I’m a totally hopeless case when it comes to loom knitting. I get teary and drool at the sight of yarn, thinking of all the wonderful things I could make with it. I’m scanning YouTube and the web for various new stitches and projects to challenge me. I discovered websites for men who knit. I learned to loom knit my first sock and I’m becoming more familiar with all the knitting terminology. I’m starting to combine different yarns to see how they look together. I haven’t scratched a single piece of scratchboard for awhile. And now my coworkers know that I loom knit, and I’m not ashamed. One of them even asked me to make a hat, and when I made it for him, he bought it (my first sale, yippee!) It’s official: I’M A LOOM KNITTER!!! Deal with it. I wonder if there is a way to combine knitting and scratchboard…

Here are a few of the projects I’ve been working on to date -
My adult hat collection:
This was an experiment I did using Lion Brand Homespun Montana Sky and some glass beads I bought from Michael's. I strung the beads onto the yarn and kept moving them down the yarn as I knit until I got to where I wanted to place them. It was a tedious process. Once it was done the beads were loosely attached after all that, and they flop around. Next time I will add the beads after I finish the hat. I think next time I would also use more beads or larger beads.
This is my hat, which I used Lion Brand Thick and Quick navy blue wool, and another navy blue regular yarn. I created brims for all my other adult hats, but this was the first one I tried without a brim. I thought if I didn't make a brim that it might unravel, but that isn't the case, so some of my baby hats are brimless also. The two blues are different hues; if you look carefully you can see it:

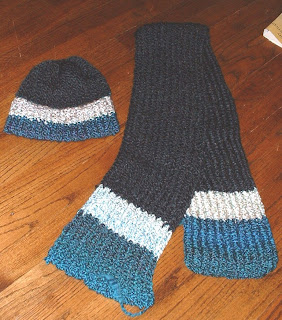
This is a hat and scarf set I did using Homespun Black, Montana Sky, and the remnants of another mixed white Homespun that I had:
Another hat I made, using Lion Brand Homespun Harvest. I like the variations in color:
This was my first baby hat. I used Bernat Baby Coordinates White. It has a silky white strand running through it, I don't know if you can see that from the picture. After I made this hat, I just kept adding the Bernat White to everything else I did:

Here are a few baby hats that I combined different weights of yarn together, just to experiment.
This one has three different color strands and is very thick. It wasn't too hard working with three strands but it was a little tricky making sure they were all together on each peg:


Here is the Montana Sky and Bernat White together:

Next to the white baby hat, I think I like this one (Bernat white and Homespun Saffron) the best:


Here’s my first sock. I figured I would try to figure out on my own how to make the heel, but my meager attempts did not work (i.e decreasing the size and then just leaving one stand on a peg while I continued to knit, hence the loop you see hanging out from the side). So I turned to the web, and after some clear instructions I figured it out:


Here’s my attempt at alternating ribbed stitches. I like how the pattern looks, and though the yarn looks black it is actually navy blue. Can you see the pattern? The photo didn't really translate it too well. I was running out of the blue yarn, so I started playing with the pattern a bit, making it smaller.


Finally, I am attempting to make a poinsettia (using Lion Brand Holiday Homespun Holly) based on a tutorial I found on the Loom Lore blog (Friday, 12/7/07): http://loomlady.blogspot.com/. It took me nearly an hour to do the first leaf, since I wasn’t used to the technique involved with making it. The yarn keeps getting so tight, I have to fight with it to get it to pull it over the pegs sometimes. But the results come out so tightly woven it’s nice. And I like how I can pull together one end of the yarn and it closes the knitting up, and the more you knit the more it starts making a cup-like shape. Eventually I am going to have a complete flower to post on my blog, and I will be so proud of it!
The photo is a little dark because that red yarn is so bright that the camera flash made it too intense. Those "sparkles" are the yellow thread that holds the yarn together.
You might think I am partial to Lion Brand yarn, and I do admit that I enjoy using it very much, but I also can appreciate the fine yarns from other manufacturers and from individuals that I see online at etsy and other sites.
You can see I've been busy!!! Maybe you should get a loom and see how much fun it is for yourself!